Posts: 6,438
Threads: 0
Joined: Feb 2006
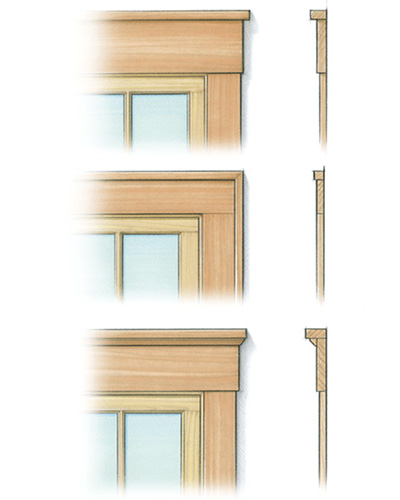
The example in the middle:
What's this style called? I want to lookup more detail about what the sill would look like and the appropriate dimensions and construction approach (like is the narrow edge detail rabbeted, how thick etc)
Thanks!
Posts: 15,161
Threads: 0
Joined: Feb 2002
Location: Northeastern MA
(06-02-2023, 08:14 AM)mound Wrote: The example in the middle:
What's this style called? I want to lookup more detail about what the sill would look like and the appropriate dimensions and construction approach (like is the narrow edge detail rabbeted, how thick etc)
Thanks!
Ha! I recognize that pic from a issue of FHB I used ~10 years ago when trimming out window in my son's room (in our old house). I used the top example.
https://www.finehomebuilding.com/project...trim-ideas
I think they just tacked on some additional molding once the main trim was installed. Not rabbeted, just nailed. see the link here. I would call that a picture frame detail over a mission style trim.
https://www.finehomebuilding.com/project...up-molding
As far as dimensions, I think that trim carpenters generally use whatever standard molding they can get from the supply house. When I did my kids window, I milled my own, and simply sketched the dimensions on the wall until I liked the proportions. Once my wife approved

, I started cutting stock.
You are frequently puzzled by things you tell us you fully understand. - Bob10 to EH 9/22/16
Too much has been made out of my mostly idle comments - Cletus 12/9/15
You sound like one of those survivalist, hoarder, tin foil hat, militia, clinger, wackjobs. - Fear Monger 1/30/13
Posts: 6,438
Threads: 0
Joined: Feb 2006
Thanks! Yah, looks like that image I grabbed from google is from FHB.
I was thinking about just getting a bunch of rough poplar and milling it all, but then a buddy told me about a local millwork house that would have everything I needed pre-primed, which would save time, not sure if it saves money. I wanted to be armed with as much knowledge as needed before I walk in there and ask.
Posts: 2,638
Threads: 0
Joined: Feb 2011
Location: Elkhart, IA
The middle example is what we had in our last house - there is no sill. It just picture frames the window all the way around. Its a "craftsman style" but not really....
Posts: 1,873
Threads: 0
Joined: Feb 2008
O.k., you wanted some knowledge. First, the sill is basically the sloped foundation of the window frame. the trim on top of it is a stool cap (and no, I don't know why it's called that.) When you're joining the head and side casings use a T&G joint, or biscuits at the very least. You'll have a much better chance of those joints being flat it you glue it up on the bench vs. the wall; especially if it's picture framed. If the window frame protrudes from the wall, plane it flush. If it's recessed, either pull it in or deal with the gap with the "stop bead". That's the molding that keeps the lower sash snug against the "parting bead" (the 3/8" x 3/4" fir strip between the two sashes).
If you want a stool cap, which I prefer, most have a thumb nail profile (Picture a 1" dia. bullnose on 3/4" stock) on the front and ends, and protrude 1/2"-3/4" in front and beside the casing. The apron or skirt beneath the stool does not necessarily have to be the same as the casing, but it should end directly in line with the sides of the casing. If the apron has a face profile, it should be duplicated on both ends.
Sign at N.E. Vocational School Cabinetmaking Shop 1976, "Free knowledge given daily... Bring your own container"
Posts: 6,438
Threads: 0
Joined: Feb 2006
(06-03-2023, 12:45 AM)MstrCarpenter Wrote: O.k., you wanted some knowledge. First, the sill is basically the sloped foundation of the window frame. the trim on top of it is a stool cap (and no, I don't know why it's called that.) When you're joining the head and side casings use a T&G joint, or biscuits at the very least. You'll have a much better chance of those joints being flat it you glue it up on the bench vs. the wall; especially if it's picture framed. If the window frame protrudes from the wall, plane it flush. If it's recessed, either pull it in or deal with the gap with the "stop bead". That's the molding that keeps the lower sash snug against the "parting bead" (the 3/8" x 3/4" fir strip between the two sashes).
If you want a stool cap, which I prefer, most have a thumb nail profile (Picture a 1" dia. bullnose on 3/4" stock) on the front and ends, and protrude 1/2"-3/4" in front and beside the casing. The apron or skirt beneath the stool does not necessarily have to be the same as the casing, but it should end directly in line with the sides of the casing. If the apron has a face profile, it should be duplicated on both ends.
Thanks!


 , I started cutting stock.