Santa's workshop 2019
#8
Just got finished in Santa's workshop making a gift for a very special lady. It commemorates the best weekend ever down in Miami/Hollywood/West Palm beach. We had VIP tickets for a Tesla and Kix concert. We got a meet and greet with Tesla. We also got to meet Kix guitarist Brian Forsythe (who autographed a Marshall amp head for me). We even caught a Nationals spring training game (and they won!). The first pic was a rendering I did in Visio as I was planning the layout. I am making two...mine won't be finished until I get her autographed Tesla pic - that will be after Christmas...


This is the finished product
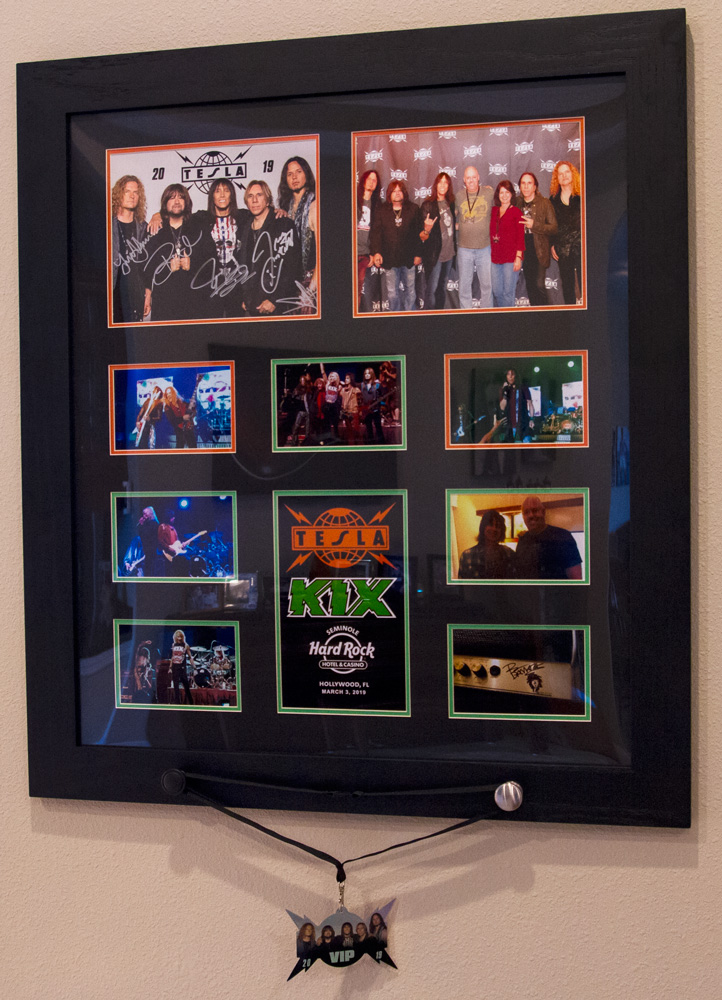
   

I have done some framing before but this is the first time I didn't use glazer's points to attach the back. This method took a bit more planning but should hold up well.


This was the first time I did a mat this complicated - double mat collage. I had to engineer a jig to use with my mat cutter to give me more support and larger "square" surface so that I could cut square openings in the middle of a large mat. It worked out great!

   
Reply
#9
(12-14-2019, 05:00 PM)FLWoodworker84 Wrote: Just got finished in Santa's workshop making a gift for a very special lady. It commemorates the best weekend ever down in Miami/Hollywood/West Palm beach. We had VIP tickets for a Tesla and Kix concert. We got a meet and greet with Tesla. We also got to meet Kix guitarist Brian Forsythe (who autographed a Marshall amp head for me). We even caught a Nationals spring training game (and they won!). The first pic was a rendering I did in Visio as I was planning the layout. I am making two...mine won't be finished until I get her autographed Tesla pic - that will be after Christmas...


This is the finished product


I have done some framing before but this is the first time I didn't use glazer's points to attach the back. This method took a bit more planning but should hold up well.


This was the first time I did a mat this complicated - double mat collage. I had to engineer a jig to use with my mat cutter to give me more support and larger "square" surface so that I could cut square openings in the middle of a large mat. It worked out great!

Fabulous!
Reply
#10
Good job!! ...............
Steve

Missouri


The Revos apparently are designed to clamp railroad ties and pull together horrifically prepared joints
WaterlooMark 02/9/2020


Reply
#11
I did quite a number of these when I had my framing studio.  The top mat is the only one that has to be engineered. 

For the the bottom mat, I simply cut small mats for each photo and mount the photo in each small mat.  Then I would use adhesive transfer tape and align each small mat behind the top mat. 

When all the images are in place I would add a backer board (another mat board), and then a dust cover.

I would definitely add a dust cover (kraft paper).  I used adhesive transfer tape for that too.  Then I would lightly mist the paper with water and wipe off the excess.  When it dries it will be tight as a drum. 

Add your hanger and hanging wire. 

I'm not sure I would trust the saw tooth hanger for a large frame.  Picture frame wire and d-rings are better.

[Image: 61kz9RdxwTL._SX466_.jpg]

This type of hanger hook is superior.  The nail is hardened spring steel and makes a smaller hole.  Two hooks about 2" apart will keep the picture on the level.

And when you wrap the picture wire, it should look like a tidy noose, with tightly wound  coils.  None of this matters a bit except it makes a really good impression (and satisfies my need for craftsmanship).

But I would definitely lose the saw tooth hanger.  The nails tend to pull out over the years and the hardware itself is quite soft and weak.

[Image: wall-hooks-picture-hanging-hardware-mirr...2x1092.jpg]
No animals were injured or killed in the production of this post.
Reply
#12
Well done. A question: what is the fasteners in the washers for the back. I can't make out whether those are small screws, pins, or whatever (aging eyes).
I started with absolutely nothing. Now, thanks to years of hard work, careful planning, and perseverance, I find I still have most of it left.
Reply
#13
(12-18-2019, 01:45 PM)Cooler Wrote: I did quite a number of these when I had my framing studio.  The top mat is the only one that has to be engineered. 

For the the bottom mat, I simply cut small mats for each photo and mount the photo in each small mat.  Then I would use adhesive transfer tape and align each small mat behind the top mat. 

When all the images are in place I would add a backer board (another mat board), and then a dust cover.

I would definitely add a dust cover (kraft paper).  I used adhesive transfer tape for that too.  Then I would lightly mist the paper with water and wipe off the excess.  When it dries it will be tight as a drum. 

Add your hanger and hanging wire. 

I'm not sure I would trust the saw tooth hanger for a large frame.  Picture frame wire and d-rings are better.

[Image: 61kz9RdxwTL._SX466_.jpg]

This type of hanger hook is superior.  The nail is hardened spring steel and makes a smaller hole.  Two hooks about 2" apart will keep the picture on the level.

And when you wrap the picture wire, it should look like a tidy noose, with tightly wound  coils.  None of this matters a bit except it makes a really good impression (and satisfies my need for craftsmanship).

But I would definitely lose the saw tooth hanger.  The nails tend to pull out over the years and the hardware itself is quite soft and weak.

[Image: wall-hooks-picture-hanging-hardware-mirr...2x1092.jpg]

Thanks for the insight, Cooler. I did the sawtooth because "that's what I know". But...I did drill exact size pilot holes for the nails. I put a dot of gel superglue on the pilot holes and pushed the nails in with a nail set. I will certainly keep your hanging method in mind as I put my version of this frame together.
Reply
#14
(12-18-2019, 02:07 PM)fredhargis Wrote: Well done. A question: what is the fasteners in the washers for the back. I can't make out whether those are small screws, pins, or whatever (aging eyes).

Fred, they are small screws.
Reply


Forum Jump:


Users browsing this thread: 1 Guest(s)

Product Recommendations

Here are some supplies and tools we find essential in our everyday work around the shop. We may receive a commission from sales referred by our links; however, we have carefully selected these products for their usefulness and quality.